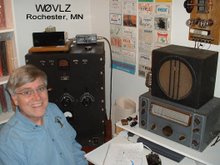
Over the past many years I've homebrewed many receivers and transmitters along with several accessory pieces.
Go to http://wiegandfamily.org/W0VLZ_Homebrew/W0VLZ_Gallery.htm to see my vintage homebrew projects.
This is a blog about my ham radio experiences including vintage homebrew, QRP operating and the National Radio company.
|
To see if I'm on the air right now click
here
|
Over the past many years I've homebrewed many receivers and transmitters along with several accessory pieces.
Go to http://wiegandfamily.org/W0VLZ_Homebrew/W0VLZ_Gallery.htm to see my vintage homebrew projects.
Here's the construction information on my version of this transmitter: http://wiegandfamily.org/6AG7_Xmtr/1951Transmitter.htm
One of my favorite homebrew receivers is the one I built based on the "Two Tube Superhet Receiver" shown in the 1941 ARRL Handbook. This one has a regenerative detector running at 1700KHz with a tunable convertor stage (covering 80 and 40) and a single stage of audio.
After few minutes of playing with the two tube superhet on 40 meters I decided that a BFO was needed for reasonable CW and SSB reception. The two tube superhet became a three tuber. The regenerative IF remained. It is not typically run into regeneration but just below to improve IF gain and selectivity. As a modern safety measure I RC coupled the headphones into the plate circuit of audio stage rather than directly connecting them. Read about this project here.
I then decided to make a major improvement by adding a crystal filter. This gives this simple receiver almost single signal selectivity. At 6dB down, the bandwidth is only 250Hz. Inserting the crystal into the middle of the regenerative IF stage feedback loop allowed regeneration to make up for crystal insertion loss without adding an extra tube. Also modified from the original was changing the regenerative detector from 1/2 of a 6C8 to a 6J7, adding better bandspread and a front panel BFO adjustment. The attenuator on the antenna input was added after experiencing problems from strong signals overloading the receiver. This version is described here.
The single AF stage really did not drive a speaker very well. As built this is a headphone radio. In addition it needed an external power supply. I built another AF stage (with a speaker) and a power supply into an external box. In addition I added a toggle / Transmit-Receive switch.
I typically use this receiver with my 6J5-6L6 Transmitter.
It's 60 degrees and sunny today. After a "Minnesota Nice" winter and playing with Boat Anchors in the Basement it is turning into time to take my KX3 to a local
park.
Last night I gave a "QRP in the Park" talk at the meeting of the Rochester Amateur Radio Club. I covered many possible objectives of portable operating, how these might affect equipment/operating plans and then looked at some of today's options and my specific equipment and antenna choices.
Download a pdf version of my talk here: http://wiegandfamily.org/QRP/QRPInTheParkTalk_10Apr2024.pdf
See a video showing me setting up my 20 mtr C-Pole vertical here: https://youtu.be/nYn-GnwcSoE
See a video showing how to get an antenna wire over a tree limb here: https://youtu.be/zibrXtaG_Ro
Here is a look at my stations through the years: http://wiegandfamily.org/shack_tours/shacks.html
Looking over my shack I see a lot of two tube homebrew receivers, mostly regeneratives. It's time for a two IC receiver.
I've been a fan of direct conversion receivers for some time. Unfortunately most of them have left the market but recently my search found the QRPKits / Pacific Antenna 40 mtr Easy Rcvr. While only covering 75KHz of 40 meters the $25 price tag made it sound interesting. If I don't actually use it on the air maybe I can recommend it to a friend of mine as a learning tool and cheap way to listen in to ham QSOs.
My $25 (plus tax and shipping) got me a small plastic bag with all of the parts plus knobs, antenna connector and a 9V battery connector. A battery, antenna and ear phones/buds were all that was needed to put it to use.